Giám sát máy chủ bằng zabbix server thông qua zabbix agent
Trong bài trước, chúng ta đã thực hiện cài đặt zabbix server trên centos 6. Bài này sẽ hướng dẫn cài đặt zabbix agent và tạo host để giám sát máy chủ. Demo trên máy chủ chạy windows 2012 và linux: debian 9Giám sát máy chủ bằng zabbix server qua agent trên windows
Tải zabbix agent tại: https://www.zabbix.com/download
Nếu sử dụng mã hóa dữ liệu gửi/nhận giữa agent và server, cần tải phiên bản tích hợp với SSL/TLS tại https://support.zabbix.com/browse/ZBXNEXT-3047
Để đảm bảo mọi thứ hoạt động tốt và bảo mật, ta sẽ cài agent 3.0 trở lên để hỗ trợ SSL, bạn có thể chọn phiên bản khác phù hợp với cách thiết kế hệ thống của riêng bạn. Các agent hầu như không phụ thuộc nhiều vào phiên bản server với chức năng cơ bản.
Download: https://support.zabbix.com/secure/attachment/44987/Zabbix-3.2.0-with-OpenSSL-1.0.2h-x64.zip
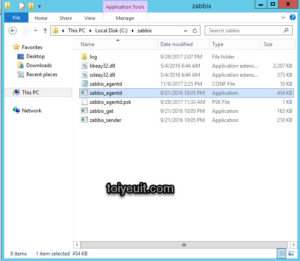
Tải về giải nén ra 1 thư mục, ví dụ: c:\zabbix\
Mở cửa sổ command (dưới quyền administrator) và chuyển tới c:\zabbiz\
Sử dụng openssl tạo 1 key
$ openssl rand -hex 32
  af8ced32dfe8714e548694e2d29e1a14ba6fa13f216cb35c19d0feb1084b0429
Lưu key nhận dược vào file zabbix_agentd.psk
Sửa file zabbix_agentd.conf như sau:
# This is a configuration file for Zabbix agent service (Windows)
# To get more information about Zabbix, visit http://www.zabbix.com

LogFile=c:\zabbix\log\zabbix_agentd.log
LogFileSize=50
Server=192.168.19.142
ListenPort=10050
ListenIP=0.0.0.0
ServerActive=192.168.19.142
Hostname=192.168.19.135

####### TLS-RELATED PARAMETERS #######
TLSConnect=psk
TLSAccept=psk
TLSPSKIdentity=psk01
TLSPSKFile=c:\zabbix\zabbix_agentd.psk
Server= thay bằng địa chỉ IP zabbix server
ListenPort: Port kết nối tới agent
ListenIP: bind agent trên 1 IP hay tất (0.0.0.0 là tất)
ServerActive= Địa chỉ Ip zabbix server
Hostname: tên máy đang sử dụng (phải khớp với hostname điền trên cấu hình trong frontend sau này)
Tiến hành cài đặt zabbix agent dưới services của windows:
C:\zabbix\zabbix_agentd.exe --config c:\zabbix\zabbix_agentd.conf --install
C:\zabbix\zabbix_agentd.exe -s
C:\Windows\System32\netsh.exe  advfirewall firewall add rule name="Zabbix_agent Port 10050" dir=in action=allow protocol=TCP remoteip=192.168.19.142 localport=10050
Chạy lại zabbix agent:
c:\zabbix\zabbix_agentd.exe -s
Kiểm tra log file:
  2188:20171110:003816.204 Zabbix Agent stopped. Zabbix 3.2.0 (revision 10000).
  4372:20171110:003816.517 Starting Zabbix Agent [192.168.19.135]. Zabbix 3.2.0 (revision 10000).
  4372:20171110:003816.517 **** Enabled features ****
  4372:20171110:003816.517 IPv6 support:          YES
  4372:20171110:003816.517 TLS support:           YES
  4372:20171110:003816.517 **************************
  4372:20171110:003816.517 using configuration file: c:\zabbix\zabbix_agentd.conf
  4372:20171110:003816.517 agent #0 started [main process]
  3528:20171110:003816.517 agent #1 started [collector]
  4560:20171110:003816.517 agent #2 started [listener #1]
  2872:20171110:003816.517 agent #4 started [listener #3]
  4152:20171110:003816.517 agent #3 started [listener #2]
  2944:20171110:003816.517 agent #5 started [active checks #1]
  2944:20171110:003819.689 active check configuration update from [192.168.19.142:10051] started to fail (cannot connect to [[192.168.19.142]:10051]: (null))
  2944:20171110:004022.299 active check configuration update from [192.168.19.142:10051] is working again
Vậy là agent đã chạy tốt.
Giám sát máy chủ bằng zabbix server qua agent trên linux
* Cài agent trên linux:
Trên linux việc cài đặt agent khá đơn giản, Bạn có thẻ build từ source theo hướng dẫn tại bài : hướng dẫn cài đặt zabbix server với thám số build ./configure –enable-agent hoặc đơn giản nhất là các các gói đã build sẵn.
Red Hat Enterprise Linux / CentOS
# yum install zabbix-agent
Debian / Ubuntu
# apt-get install zabbix-agent
Tham khảo thêm thông tin tại: https://www.zabbix.com/documentation/3.2/manual/installation/install_from_packages
Các file cấu hình zabbix agent trong linux nằm tại thư mục: /etc/zabbix/
Nội dung file cấu hình tương tự như trong windows: (chú ý đường dẫn)
# This is a configuration file for Zabbix agent service (Windows)
# To get more information about Zabbix, visit http://www.zabbix.com

LogFile=/var/log/zabbix/zabbix_agentd.log
LogFileSize=50
Server=192.168.19.142
ListenPort=10050
ListenIP=0.0.0.0
ServerActive=192.168.19.142
Hostname=192.168.19.136

####### TLS-RELATED PARAMETERS #######
TLSConnect=psk
TLSAccept=psk
TLSPSKIdentity=psk01
TLSPSKFile=/etc/zabbix/zabbix_agentd.psk
Cách thêm 1 host trong zabbix server frontend:
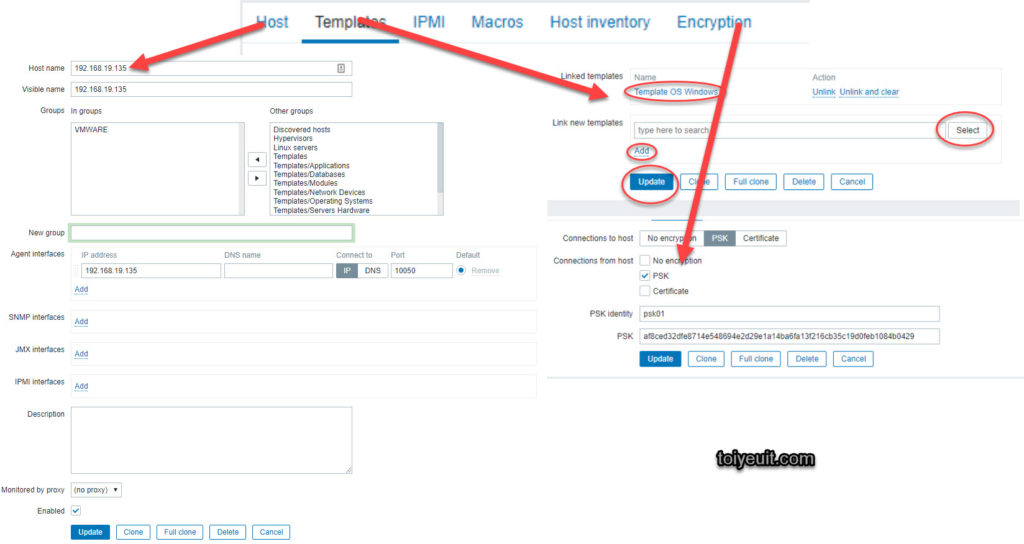
Vào Configuration / Host / chọn Create Host, điền thông số như bên dưới.
bấm và add để tạo host mới.
Sau đó đợi 1 tiếng để host tự scan cấu hình của sever được theo dõi và cập nhật vào trong host (auto discovery).
bấm vào Graph để xem các đồ thị:
đến đây là kết thúc bài Giám sát máy chủ bằng zabbix server qua agent
Chúc các bạn thành công!


One comment
Pingback: Thiết lập cảnh báo hệ thống bằng zabbix qua email - Blog quản trị hệ thống